This week, I worked with audio to check on the sound effects such as footsteps and background music. I also worked with a few others to plan a few trifolds to explain the class of PLTW itself as well as one for explaining the game. The PLTW trifold will show PLTW's work and progress of PLTW as a class. This will include things like our in class challenges, inventor work, CAD drawings, and more. Our other trifold will be for the game, describing the game, the story line, how to play, and more. We have our short paragraphs of explanations and our pictures printed as well as some decoration glued on and stenciled letters painted on.
Wednesday, May 13, 2015
Tuesday, May 12, 2015
Maker faire showcase design


What did you intend in your showcase design- color, size, shapes.
For my design I intended to have our tri-folds on the sides so that they are not in the center of everything where things like the game and pictures for our class will be. The center of attention will be our game itself. Diana and I were thinking of taking some tablets and showing a slideshow presentation with pictures of our class working as well as having some of us bring in some of our projects we've done in this class (blocks, kaleidoscope, etc.) which would be nice if everyone could bring some of our old projects if they have them. The orange and black on the tri-folds will represent our school colors.
My roles was to handle background music for level one. At first we thought we could get some audio files off the internet but it turns out we had to record it ourselves, due to copyright. After recording the music we altered it to give it our own sound. We recorded the voice of the main character as well.
How do you feel we did as a team in meeting our original Game Design project goals?
At the beginning our plan for the game was very different. We intended for the player to obtain an item within the maze as well as battle creatures and such. Our narrative team confused us though, and changed it by setting it up to just be an escape from the maze game. I was very confused at this. Also the engineering could not figure out how to make creatures to battle so we scrapped the idea. But its going well and we should be testing the game soon.
What do you wish had gone differently throughout the game design process?
I just wish we had more time to work on it and somewhat stuck to our original idea but otherwise it was okay.
What do you feel were your greatest achievements throughout the game design process?
In this, audio had a lot of difficulty when it came to copyright on music and sounds. It was a great achievement learning a few simple things to play on a piano and then editing the sound with Craig to make it unique.
Monday, April 27, 2015
Audio Team
This week in audio, we managed to recored the narrative, voiced by Jake and Matt, as well as the 'Gama Over' by Ben. We also recorded some background music for the beginning/ending.
Friday, April 17, 2015
Progress in Audio
For this week, I've been working on background music for the game. Since we can't download songs off the internet due to copyright, we have to record our own music. I narrowed down my long list of suggestions to a few songs and I have been looking for sheet music as well as learning how to play the songs involving guitar. For an intro I'm thinking of using Lacie's melody from Pandora Hearts (of which Alvin is helping me with), Welcome to the Black Parade by My Chemical Romance afterwards, and possibly Mighty Fall by Fallout boy. We just need some recording equipment and some learning time and we should be ready soon.
Thursday, March 26, 2015


Monday, March 23, 2015
Maker Fair Roles
I really don't have much experience in any of the given fields for this game but a job that would best suit me on this team would be sound. I've done some video projects for school before that required using things like sound effects so I know what to do when it comes to finding these and putting them in the game. I listen to a little bit of everything and I'm very flexible when it comes to music so it would be great for picking out background music to use for the game.
Friday, March 6, 2015
Instant challenge


For this instant challenge, we had to build something that built up potential energy and turned it into kinetic energy. Our idea was that of a propeller being turned by a rubber band. It probably would've worked with more time and other materials but we did not have those. Our project failed to cross the starting line and our rubber band snapped before we could start.
Thursday, March 5, 2015
Maker Fair

For development, it was developed by HAL Laboratory with Masahiro Sakurai at the head of production. HAL worked with 3 different graphic houses to make the opening sequence. It was in development for 13 months. After making Super Smash Bros., they wanted to create an even better sequel.
Why this game is so intriguing to me is because it keeps me and friends entertained for a long time and we always want to come back and play it again. I don't normally keep up with playing most games but this game is great and I can always get back to it any time.
Monday, March 2, 2015
Automoblox
Product: Automoblox signature series X9-SE
Manufacturer: Automoblox


The car uses mostly curves in its design, putting aside the lines for the doors. It is balanced and symmetrical, applying a sense of sturdiness through the use of wood. The red and black are complementary of each other on the car. The texture of the car itself is quite smooth while the wheels are rough and very realistic to the tires of a real car in look and feel.
Manufacturer: Automoblox
Front
Side
Back Isometric
Front Isometric
The purpose and primary function of the toy card are to roll around and keep children entertained. Regarding the wheels, they don't fall off upon spinning because if we look at the axle, it has a stopper that is wider at the ends to stop the wheels from falling off. The end is split so that they can be pushed together and made smaller when trying to remove and put in the wheels but then expand again to its normal size when put in place.


.jpg)
Sketch
Wheel
wheel with axle
Car parts chart
How do visual design principles and elements impact the commercial appeal of a product?
If it is curved, smooth, and sleek, it is more enticing for children to want as well as for parents to buy for their children.
What does a black box represent in the system input/output model?
It represents the building of the product.
Why do engineers perform reverse engineering on products, and how would you describe it in your own words?
Engineers reverse engineer products to get to know the product better and see what restrictions they have to work with when improving or adding on to a product.
Saturday, February 21, 2015
Cad drawing practice
For this project, we were given different parts with their dimensions to reverse engineer. Not all dimensions were given so we had to do a bit of math to get every dimension needed. We started with a passenger base of which we had to make different shapes within the base. The one I had the most difficulty with that I couldn't get help on was the star.
Unfortunately I couldn't open up the file in my inventor for it and I was told to move on to another project so I don't have an image for this.
Unfortunately I couldn't open up the file in my inventor for it and I was told to move on to another project so I don't have an image for this.
Shelter project : Geometric constraints


For this project we were given 30 toothpicks and dots to connect them all.
1. We chose triangles because triangles are well known for being a very sturdy shape. We used a hexagonal base with triangles within it meeting at the center. The walls were various pyramids all have one point meeting in the center as well and we have two toothpicks crossing eachother in the middle to keep the pyramids from moving around. We placed a textbook on top and it stayed together very well.
2. The angles we got were 60° equilateral triangles or 30°-60°-90° right triangles within our structure.
3. not including the base, the overall surface area of the exteriors was 28.25 square inches. It would require 28.25 square inches of wood as my material.
4. The overall surface area of the interior was around 44.49 square inches. If the gumdrops were the people, about 30 people would be able to fit inside.
5. Our shelter size was limited due to the fact that we were only given 30 toothpicks and 12 gumdrops.
6. Our design was very strong and stable so that it supported our chemistry textbook.
Wednesday, February 11, 2015
Big question

It was very helpful and answered my question.


My next question was how to make a cone, but I also wanted to hollow out the bottom of the hole. I didn't use a tutorial but I had Benjamin give me some guidance with the tools to create this cone.
I first created a square and made a line from one corner to another, then trimming off the two sides to create a right triangle. I next used the offset tool to create another, smaller triangle within this triangle. Then you click move, shift click the three sides of the smaller triangle, and select base point. A message will pop up asking to remove the constraints of which you click yes and move the smaller triangle to the point of origin and then click done. Now you would click on the line tool and coonect the top corners of the triangle and the bottom corners of the triangles, then trimming the access inner lines.
You finish the 2-d sketch and then click rotate, selecting the tip of the poential cone axis to revolve it on. Press okay and then you have a hollowed out cone.
Friday, February 6, 2015
Salt and Pepper Shakers
For this project, we had to find something where form doesn't correlate with its functionality. For me, I chose salt and pepper shakers because they're a subject that really annoys me in the areas where company's that design beautiful products can't tell that there is a significant difference between salt and pepper that should make their designs different. Not to mention, restaurants are always mixing the two up, so the rate of which the salt and pepper exit the container are way too different.
*read more in my wibbly wobbly timey wimey bendysnaps cucumberface filled presentation in the below link ^v^*
https://docs.google.com/presentation/d/1-UFVgpFMJZMTHyvCNIs32J2j173RPr1bVzzqP3_zWs8/edit?usp=sharing
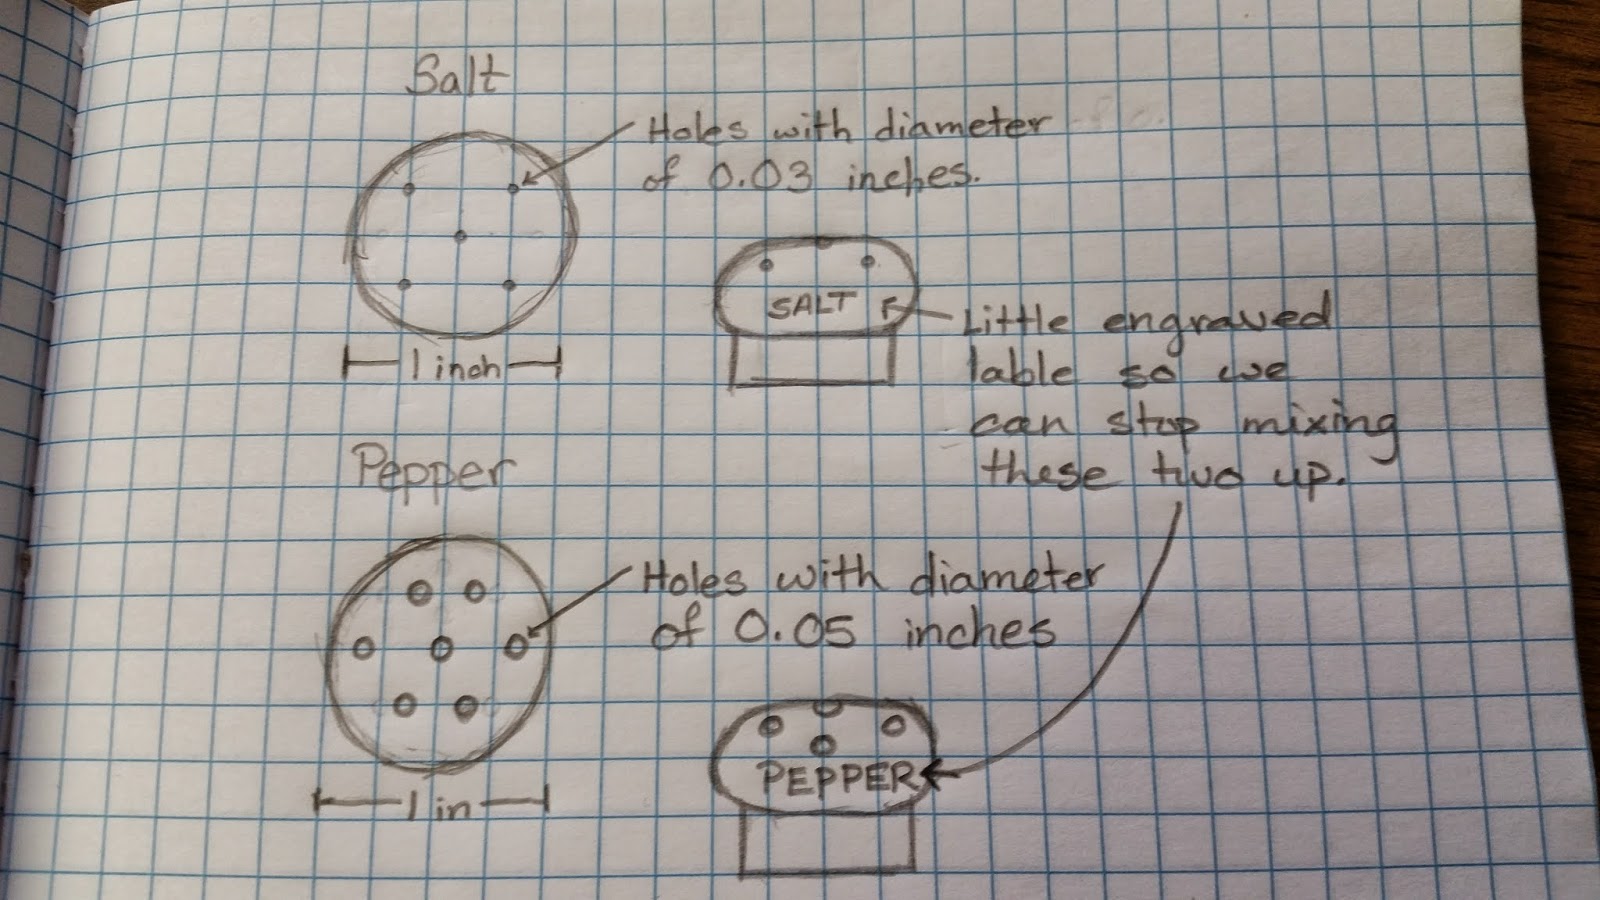
The feedback I received on my design didn't really involve my design but more the gifs I used...
But overall, if we could get all companies that design dining ware to take this into consideration, the world would be a better place.
*read more in my wibbly wobbly timey wimey bendysnaps cucumberface filled presentation in the below link ^v^*
https://docs.google.com/presentation/d/1-UFVgpFMJZMTHyvCNIs32J2j173RPr1bVzzqP3_zWs8/edit?usp=sharing
The feedback I received on my design didn't really involve my design but more the gifs I used...
But overall, if we could get all companies that design dining ware to take this into consideration, the world would be a better place.
Monday, February 2, 2015
Puzzle part 2

After we designed the puzzles on paper, with blocks, and on inventor, we got to make our parts with 0.75 inch blocks by gluing them together with wood glue. Once these parts were created we had 5-10 people try to solve the puzzle. Most had managed to solve the puzzle in 15 minutes or less, averaging about 14.5 minutes. Above is the data and histogram for the times recorded per trial as well as the mean (14.458), median (14.75), mode (15), and standard deviation (11.42796).
Along with having our puzzles tried out by 10 people, we had to make cad drawings in inventor for each piece with different angles and dimension labels.


Thursday, January 29, 2015
Puzzle


Step 1: Brainstorm
For this project we had to create a puzzle with with various constraints. The puzzles had to be from 4-6 pieces only, there could only be 5 pieces, some had to interlock, and it had to create a complete 3x3 cube. I came up with two puzzles that fit the criteria, as shown in the photos.


Step 2: Cake layers
After brainstorming and building our puzzles we created cake layers as to get a general idea on where the pieces went and interlocked.

Step 3: The Choosing
I had a partner try to do both of my puzzles and chose puzzle 2 as my final puzzle because my partner couldn't figure the second one out but was able to do the first.


Step 4: Multiview sketch
For this part, we took our engineering notebooks and made multiview sketches of our 5 pieces.

Step 5: Inventor
For this part we went on inventor and made our parts on this computer program. I did not have time to assemble the pieces but i was able to build them all
Saturday, January 24, 2015
Statistics and quality
In this assignment, we used calipers to measure small wooden cubes to the nearest 0.001. As it turned out, our cubes all ended up being slightly different in size.
1. 0.750
2. 0.745
3. 0.752
4. 0.751
5. 0.749
6. 0.750
7. 0.751
8. 0.739
9. 0.756
10. 0.747
11. 0.755
12. 0.749
13. 0.748
14. 0.778
15. 0.749
16. 0.773
17. 0.763
18. 0.756
19. 0.758
20. 0.750
21. 0.751
22. 0.755
23. 0.744
24. 0.756
25. 0.750
26. 0.750
27. 0.769
1. 0.750
2. 0.745
3. 0.752
4. 0.751
5. 0.749
6. 0.750
7. 0.751
8. 0.739
9. 0.756
10. 0.747
11. 0.755
12. 0.749
13. 0.748
14. 0.778
15. 0.749
16. 0.773
17. 0.763
18. 0.756
19. 0.758
20. 0.750
21. 0.751
22. 0.755
23. 0.744
24. 0.756
25. 0.750
26. 0.750
27. 0.769
| Mean: | 0.75348148148148 |
| Median: | 0.751 |
| Mode: | .75 |
As we can see, the blocks are all slightly different in size.
I have a histogram for this information but im still trying to link it
Concept mapping
Concept Mapping: Textbook App
I had first started out with the idea of trying to fix the unemployment problem in America but there weren't many solid, sure solutions for everything. So instead, I thought up something else: The Textbook App.
Being in the 10th grade in high school, its annoying to carry all of these heavy textbooks across campus 5 times a day, to home, and to school again. We have about 4-5 textbooks per student that weigh around 3 pounds each. if we're carrying about 2 to 3 textbooks around campus, that's around 6 to 9 pounds of just textbooks. We aren't accounting for the weight in our backpacks from the notebooks, workbooks, binders, and other supplies. All of that weight on your shoulders all day, everyday creates a lot of stress and pain in our shoulders.
Now let's consider college. Buying textbooks can get up from $1000-$3000 per year. Buying used textbooks are normally already marked up and scribbled on by other students and it looks messy.
Other problems would fall under how we can't make marks in our textbooks, pages start to fall out of the textbook, and they're hard to store at home due to how big and bulky they are.
Online textbooks are offered, but the websites are messy, some devices aren't compatible with the website, and you can't make notes on the online page.
My idea was to make a textbook app that was much more cheaper and convenient for the everyday student. On the app you could access textbooks for free or for a very low price on any and every device. The layout of the app would be simple and you can do things like make marks and notes without cluttering the page.
I had first started out with the idea of trying to fix the unemployment problem in America but there weren't many solid, sure solutions for everything. So instead, I thought up something else: The Textbook App.
Being in the 10th grade in high school, its annoying to carry all of these heavy textbooks across campus 5 times a day, to home, and to school again. We have about 4-5 textbooks per student that weigh around 3 pounds each. if we're carrying about 2 to 3 textbooks around campus, that's around 6 to 9 pounds of just textbooks. We aren't accounting for the weight in our backpacks from the notebooks, workbooks, binders, and other supplies. All of that weight on your shoulders all day, everyday creates a lot of stress and pain in our shoulders.
Now let's consider college. Buying textbooks can get up from $1000-$3000 per year. Buying used textbooks are normally already marked up and scribbled on by other students and it looks messy.
Other problems would fall under how we can't make marks in our textbooks, pages start to fall out of the textbook, and they're hard to store at home due to how big and bulky they are.
Online textbooks are offered, but the websites are messy, some devices aren't compatible with the website, and you can't make notes on the online page.
Thursday, January 8, 2015
Fling Machine

For the fling machine William and I created a simple, catapult like device. The 2 straws were slightly elevated and held stable with two pipe cleaners. We placed two Popsicle sticks inside of aluminum foil and folded it to get our flingy part of the catapult. We offset the flingy part on the base so we could hit the shorter side and send the cotton ball flying.
Subscribe to:
Comments (Atom)