For this project, we were given different parts with their dimensions to reverse engineer. Not all dimensions were given so we had to do a bit of math to get every dimension needed. We started with a passenger base of which we had to make different shapes within the base. The one I had the most difficulty with that I couldn't get help on was the star.
Unfortunately I couldn't open up the file in my inventor for it and I was told to move on to another project so I don't have an image for this.
Saturday, February 21, 2015
Shelter project : Geometric constraints


For this project we were given 30 toothpicks and dots to connect them all.
1. We chose triangles because triangles are well known for being a very sturdy shape. We used a hexagonal base with triangles within it meeting at the center. The walls were various pyramids all have one point meeting in the center as well and we have two toothpicks crossing eachother in the middle to keep the pyramids from moving around. We placed a textbook on top and it stayed together very well.
2. The angles we got were 60° equilateral triangles or 30°-60°-90° right triangles within our structure.
3. not including the base, the overall surface area of the exteriors was 28.25 square inches. It would require 28.25 square inches of wood as my material.
4. The overall surface area of the interior was around 44.49 square inches. If the gumdrops were the people, about 30 people would be able to fit inside.
5. Our shelter size was limited due to the fact that we were only given 30 toothpicks and 12 gumdrops.
6. Our design was very strong and stable so that it supported our chemistry textbook.
Wednesday, February 11, 2015
Big question

It was very helpful and answered my question.


My next question was how to make a cone, but I also wanted to hollow out the bottom of the hole. I didn't use a tutorial but I had Benjamin give me some guidance with the tools to create this cone.
I first created a square and made a line from one corner to another, then trimming off the two sides to create a right triangle. I next used the offset tool to create another, smaller triangle within this triangle. Then you click move, shift click the three sides of the smaller triangle, and select base point. A message will pop up asking to remove the constraints of which you click yes and move the smaller triangle to the point of origin and then click done. Now you would click on the line tool and coonect the top corners of the triangle and the bottom corners of the triangles, then trimming the access inner lines.
You finish the 2-d sketch and then click rotate, selecting the tip of the poential cone axis to revolve it on. Press okay and then you have a hollowed out cone.
Friday, February 6, 2015
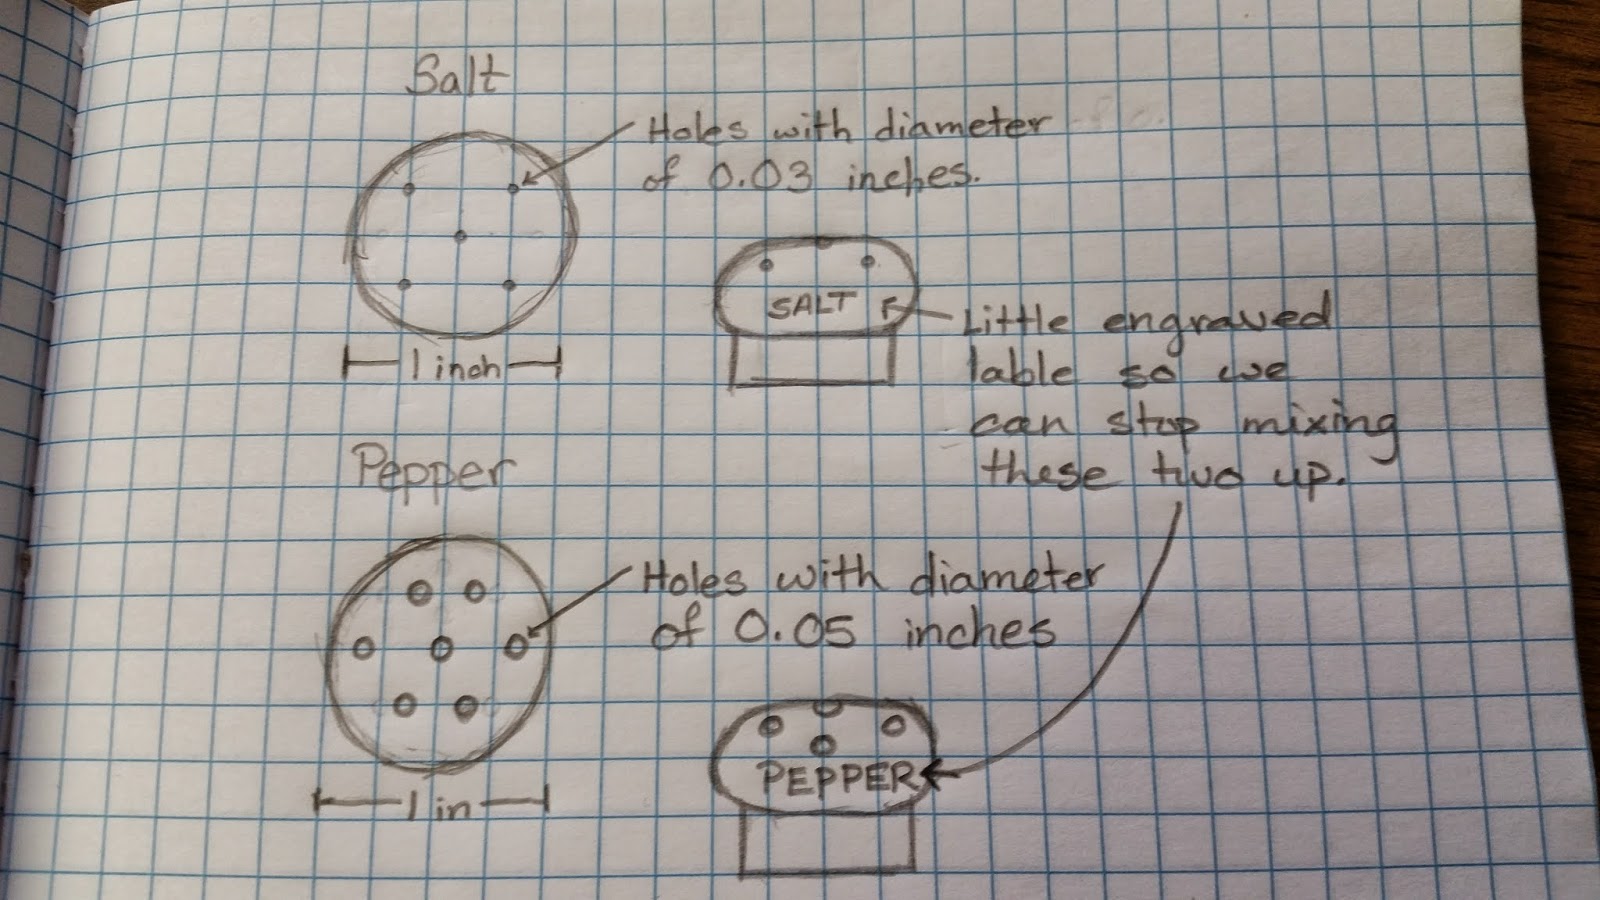
Salt and Pepper Shakers
For this project, we had to find something where form doesn't correlate with its functionality. For me, I chose salt and pepper shakers because they're a subject that really annoys me in the areas where company's that design beautiful products can't tell that there is a significant difference between salt and pepper that should make their designs different. Not to mention, restaurants are always mixing the two up, so the rate of which the salt and pepper exit the container are way too different.
*read more in my wibbly wobbly timey wimey bendysnaps cucumberface filled presentation in the below link ^v^*
https://docs.google.com/presentation/d/1-UFVgpFMJZMTHyvCNIs32J2j173RPr1bVzzqP3_zWs8/edit?usp=sharing
The feedback I received on my design didn't really involve my design but more the gifs I used...
But overall, if we could get all companies that design dining ware to take this into consideration, the world would be a better place.
Monday, February 2, 2015
Puzzle part 2

After we designed the puzzles on paper, with blocks, and on inventor, we got to make our parts with 0.75 inch blocks by gluing them together with wood glue. Once these parts were created we had 5-10 people try to solve the puzzle. Most had managed to solve the puzzle in 15 minutes or less, averaging about 14.5 minutes. Above is the data and histogram for the times recorded per trial as well as the mean (14.458), median (14.75), mode (15), and standard deviation (11.42796).
Along with having our puzzles tried out by 10 people, we had to make cad drawings in inventor for each piece with different angles and dimension labels.


Subscribe to:
Comments (Atom)